Friday, June 6, 2014

A Better Hinge

The hinge on the right is just waxed linen wrapped around the top and bottom holes. Opening and closing was putting a lot of pressure on it and I didn't want it to break for a very long time so I needed a better solution.


The left side is what I came up with. Instead of wrapping around in an O I did an S with the linen. I got the idea from book binding- Ethiopian Coptic Stitch. It works so much better and even looks pretty cool.


Thursday, May 29, 2014

The Real Obsession

People I know think that I'm obsessed with Star Wars and that's not true. The movies are more accessible so I do more from them because I know more people will be into it. The real obsession is with Hellboy but more than that it's with the art of Guillermo del Toro. I love most of what he does and Hellboy is the favorite.


Last year I wanted to make the Right Hand of Doom for the work Christmas raffle but ran out of time and kept getting sidetracked with projects for nieces and nephews.

http://creatureshop.com/


I'm still behind on a lot but I also started watching Jim Henson's Creature Shop and got a lot of ideas starting with a better way to make the hand. I knew that starting over I could probably articulate it, one of my bottlenecks last time was how the fingers were going to lay and this is a much better option. Plus when I bring it to work all of my coworkers can take turns flipping each other off with Hellboy's hand. Sigh.


I carved the spirals into the foam with a soldering iron.


This is black and red enamel spray paint, a much faster way to do it.

 
Crimson acrylics with a paintbrush. Applied liberally.


Hit it a few more times with the spray paint. I had to take this piece out because it was too big with the hand to look right.
 
The rest is in progress....


Thursday, May 15, 2014

Recycling

I posted this to another nerd blog I do but it fits in here:

The Swamp House: more pics of the process and final project by John Henry


I am in love with automatons. I want to know how they work so I can make my own weird creations. I have books and kits and papercraft kits so it's going to happen. Soon....
 
 
Watching this one is kind of hypnotic so I started to wonder how much this alligator was making based on the apparent speed of the gif. It makes ~$.125/second or ~$450 an hour. Normally you are supposed to take an average of multiple measurements but I don't think the gif will speed up at all.
 
@10 seconds I counted 5 quarters or $1.25/10seconds = ~$.125/second
 
$.125/1 sec * 60 sec/ 1 min * 60 min/1 hour =~$450/hour.
 
Not bad.


Friday, April 25, 2014

An Explorer Kit

I started here: http://makezine.com/craft/gift-idea-diy-explorer-kit/ thinking it would be a cool fast project that I could duplicate for birthdays this year. I still maintain that possibility. I needed a table saw which I can't afford but I do have a circular saw and there are a ton of tutorials on turning it into a table saw. So I did that. It's really not that safe but it did the job. Next big project is to make it safe.


Diresta made a box in the most awesome and duh way possible. He put it all together all sides on one box and then cut the entire thing out on his table saw. Oooh that was a good idea. Now it will fit perfectly! Except my 'table saw' isn't exactly straight so the box isn't square but that's ok this time around.

basic box
 
 
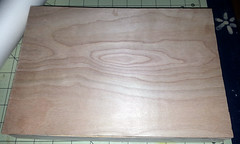
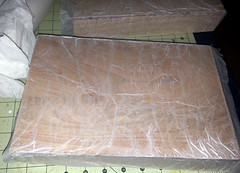
I started out with this, the wood is 1/4" so too thin for screws or nails. I used wood glue. Next up is to age the box. For that I crumpled up tissue paper and glued it, let it dry and then sanded the entire thing.
 
tissue papered
 
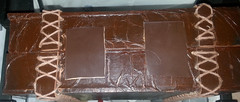
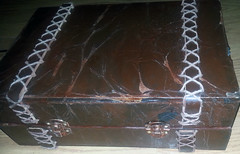
Next I spray painted it black, let it dry and then stained it with a cherry mahogany stain. I did many coats of it so it would look like old leather.


stained
 
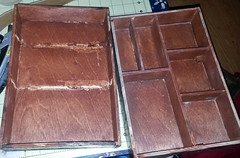
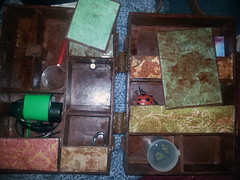
The black keeps it dark and the wrinkles show off the stain. Since this was the first one I made a lot of mistakes which I will show here so others don't make the same. I sectioned it up for the goodies.

insdie
 
 
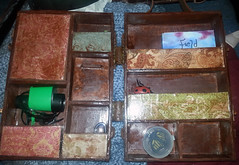
I wanted leather straps around the whole thing but didn't want it to come unglued so I criss-crossed it with linen yarn. To make that work I took out the panels and drilled holes on either side of the 2 leather straps. There was some sanding after the drilling. But this is what the inside looks like. Yeah I should have done this in a different order. I stained the yarn too.
 
 
stained linen thread
 
 
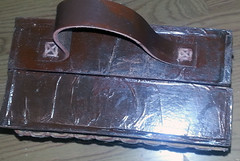
Now it needs hinges and I was too lazy/cheap to buy some hinges and I had more leather so why not use it. This caused some problems with the inside needing to be sanded again. Drill your holes first!


2014-04-19 15.00.23
 
And I did a handle the same way, I had to sand even more. Doh! Ok onto the inside. I added some explorer toys and some plastic bugs. There's even a book that says 'Field Notes' on the front.


Inside 
 
 
 With covers off
 
 
 He liked it, the kids liked it, there was fighting to look at it. It was the most popular gift until the Magic 8 Ball was unwrapped.
 
Front
 
Not my greatest woodworking but it did the job. I think I can do more. I just need to make my table saw survivable now.

Tuesday, April 15, 2014

Una Box

When I decide on something depending on what is involved I tend to plan the hell out of it. This is just page one of many.  I like to analyze dimensions and really get into it so that I understand each part and then put together as a whole.

Monday, April 7, 2014

What Could Possibly Go Wrong?

I NEED a tablesaw. Need. I can't seem to cut precise enough for my projects and it's bugging me. I have a circular saw and found some tutorials on converting it. This terrifies me every time I use it but man does it scratch an itch. My next project is to make it safer to use. I am pretty happy about this one.